
Cassandra+OpsCenter with Cloudformation and Chef
Introduction
DevOps is the new buzzword in software industry these days, but what exactly does it mean? Why is it important? What are the concepts and tools to make it happen? So today I will demonstrate these by a very simple project: a Cassandra cluster.
Here is a simple illustration of what the end result is like:

The tools we will be using are (some familiarity of the tools may be helpful, but not required for this demo. I will cover all the necessary bits.):
- Cassandra - a NoSql database
- OpsCenter - a monitoring server for Cassandra
- ChefDK (chef-solo, berkshelf, knife) - a server provisioning tool
- Vagrant - a vm management tool
- Packer - a vm box builder
- AWS - Amazon web services
And here is an illustration of the deployment process:

Resources
https://github.com/ryan-ju/aws-cassandraThe Git repo contains all the required code and scripts. We’ll use that as base directory throughout this post. Check it out!.
Before we start
Make sure you have an AWS account and have set up an access key with admin privilege (or a more restricted one if you know what to do).
You should also have AWS CLI installed. The most convenient method is with pip.
Steps
Outline
- Build Vagrant base image for local testing
- Build AMI with Packer
- Create cookbook
- Test the cookbook locally with Vagrant
- Upload the cookbook to S3
- Use Cloudformation to create a Cassandra stack and an OpsCenter stack (in the same subnet in a VPC)
Tip:
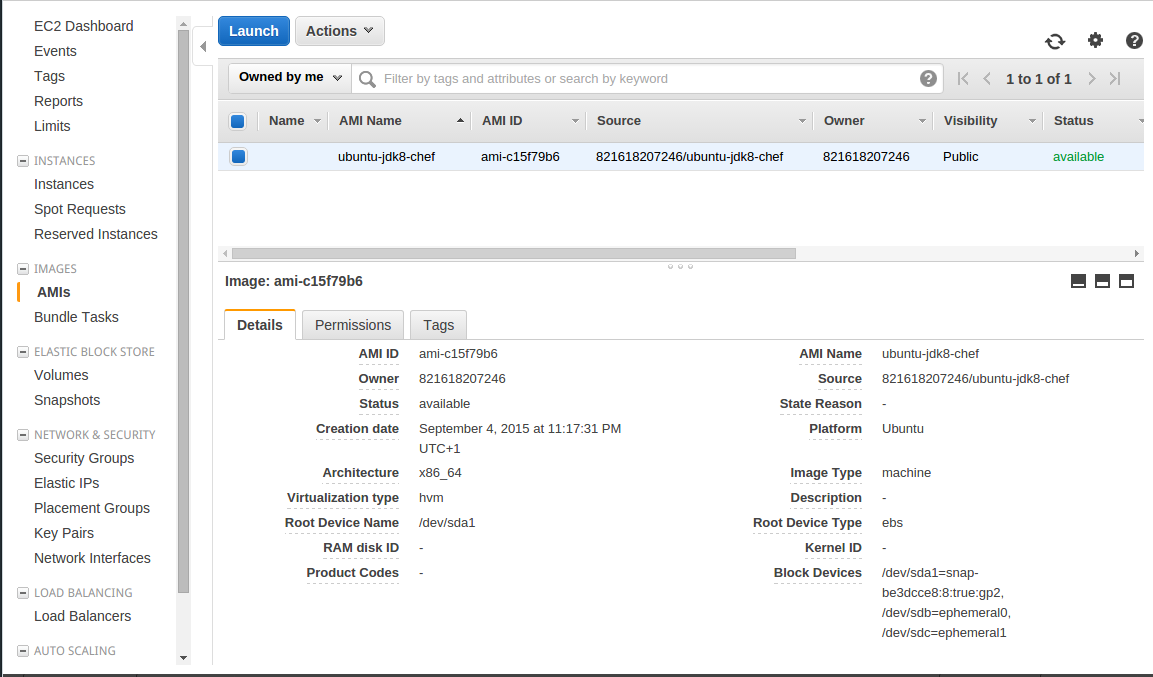
Steps 1 and 2 can be skipped if you only want to do the deployment part. I have created a public AMI for youami-c15f79b6.
Build Vagrant Base Image
Ensure you have Vagrant installed (installer).
A brief intro of Vagrant
Vagrant is a VM manager. It’s an abstraction layer between user and VM implementations like VMWare, Virtualbox and EC2 etc, providing a common interface to create, provision and destroy VMs.
Vagrant has a similar style as Docker. You create a Vagrantfile and use it to tell Vagrant how to create a VM.
You runvagrant upto start a VM,vagrant sshto log into it, andvagrant destroyto remove the VM.Note:
If you use the installer to install Vagrant, it will come with its own Ruby, which won’t interfere with your current Ruby environment if you use RVM (joy~~).
Next, download a copy of JDK 8 and store that as base-image/vagrant/tmp/jdk<version>tar.gz. I didn’t check that into GitHub due to its huge size.
Next, cd to base-image/vagrant and run
vagrant upRead the Vagrantfile and you’ll see that it uses the shell provisioner to
- install JDK8 (using the tarball)
- install Chef
- install sysstat
Once the VM finishes booting, you can vagrant ssh to inspect it. If you’re happy, run vagrant package. This will create a package.box file in pwd (your working dir), which is a box you that you can launch VMs with.
Next, add the box to your Vagrant box list by vagrant box add stackoverflower/ubuntu-jdk8-chef package.box. This will add package.box by name stackoverflower/ubuntu-jdk8-chef. You can use a different name, but I’ll stick with this.
If you want to test if the box works ok, you can create a new project, run vagrant init to create a Vagrantfile, change the line to config.vm.box = "stackoverflower/ubuntu-jdk8-chef", and vagrant up.
Build AMI with Packer
A brief intro of Packer
Packer is a box builder. Like Vagrant, it abstracts out several VM implementations. It also has a single config file style. You create apacker.jsonfile, specifying the implementation (called builder) and the provisioning, then runpacker build packer.jsonand you’ll get your box built.Why Packer for AWS?
If you ever used boxgrinder, you should know the pain of uploading an AMI to AWS (it takes AGES …). With Packer, it starts up an EC2 instance, provisions it, and builds an AMI from it. This is VERY quick.Installing Packer
It’s distributed as a zip file, and you need some manual work to install it. I’ve created a bash script for Ubuntu systems. Please read it first (it’s not difficult).
cd to base-image/packer and read packer.json. Note the following:
"region": "eu-west-1"— the box will be in eu-west-1."source_ami": "ami-47a23a30"— the base AMI to use is a Ubuntu one in eu-west-1. If you change to another region, make sure you change this."ssh_username": "ubuntu"— the use that Packer will log into your EC2 instance as. For Ubuntu images, it’s “ubuntu”; for AWS linux, it’s “ec2-user”.- Also export the env vars
AWS_ACCESS_KEY_IDandAWS_SECRET_ACCESS_KEY. Packer needs them to authorize to use AWS CLI.
Now you’re ready to build your AMI. Run packer build packer.json and observe the output.
You should see the following in your AWS console (of course your AMI ID will be different):
Create Cookbook with ChefDK
A brief intro of Chef
Chef is a set of tools to automatically provision a VM. Provisioning is the process of creating and configuring resources.
The smallest unit of provisioning is a resource, like installing a package, creating a user or creating a file from a template. Also provider, as in Vagrant and Packer, provides concrete implementation for a resource.
A recipe contains a list of resources, together with some programming logic so you can configure the parameters(attributes) dynamically. Recipe can reference other recipes, forming a nested structure.
An attribute file contains the parameter values that the recipes need.
All of the above are packaged into a cookbook, the distribution unit of Chef.
But you should notice there is no “entrypoint” to the cookbook (which recipe to run?). This is provided by a runlist.
Chef can run in two modes: server-client and solo.chef-solo
The tool we’ll be using. You run it on the VM you want to provision with the required cookbooks and a runlist, and it’ll take care of the rest.Knife
A cookbook manipulation tool. Mainly for creating and uploading cookbooks to Chef server.Berkshelf
Because recipes can reference recipes from other cookbooks, cookbooks can have dependencies on each other. Berkshelf is a dependency resolver for cookbooks. It requires a Berksfile in your cookbook dir, specifying what cookbooks it depends on and where to find them. It can also package all the cookbooks into a tarball, ready for chef-solo to run. This is what we’ll be doing.
First, ensure you have ChefDK installed.
cookbooks/cassandra-example is a cookbook I already created. You can inspect its content. The directory is generated with knife cookbook create cassandra-example.
metadata.rb shows the dependency:
depends 'cassandra-dse', '~> 3.5.0'And Berksfile shows:
source "https://supermarket.chef.io"

cookbook 'cassandra-dse', git: 'git@github.com:ryan-ju/cassandra-chef-cookbook.git', branch: 'issue223'

metadata
The content means all dependent cookbooks are downloaded from “https://supermarket.chef.io“, but “cassandra-dse” is from a Git repo, and the dependencies in metadata.rb are included.
cookbooks/cassandra-example/recipes contains two recipes, and their names tell your what they provision.
Test the Cookbook Locally with Vagrant
You need to install the vagrant berkshelf plugin. This plugin intercepts any reference to the cookbook under test and redirect it to the working dir, so you don’t need to do berks install every time you make a change.
Then, read cookbooks/cassandra-example/Vagrantfile. Notice how it’s different from the Vagrantfile for the base image creation. It allows you to create multiple VMs, provision each one differently, and bridge them into the same network so they can communicate.
You can configure the number of seed/non-seed nodes with NODE_COUNT and SEED_NODE_COUNT.
Run
vagrant upand after all VMs have started, type 192.168.2.254:8888 into your browser. You should see the following:

click on “Manage existing cluster” and type “192.168.2.100”, then click “OK”. You should see a console like this:

This means both Cassandra and OpsCenter are running correctly.
Build tarball with Berkshelf
Next, let’s build a tarball containing all the cookbooks required.
Run
berks installThis will install the current cookbook to your ~/.berkshelf/dir, as well as downloading all the dependencies. Once it’s done, run
berks packageto create the tarball.
Now upload the tarball to S3 by running
aws s3 cp <cookbook_name> s3://<bucket_name>/<some>/<prefix>/<cookbook_name>where you should’ve created a bucket called bucket_name.
A brief intro of S3
S3 is simple storage service. You an upload and download files indexed by a unique URL (s3://…). Files are automatically replicated to prevent data loss.
There is a small charge to storage capacity used.
You should see your cookbook in your S3 console:

Use Cloudformation to Launch Stacks
Setup AWS account
Firstly, you need to create a VPC, a subnet and a security group in AWS eu-west-1.
A brief intro of VPC
AWS VPC allows you to create a private datacenter with custom access rules. Inside a VPC you can create multiple subnets and set routing rules to link them together. Each VPC can have multiple internet gateways to allow internet access from instances. Some basic IP networking is required to understand all of these, but AWS doc should be sufficient.
Here are the inbound rules of my security group:
| Type | Protocol | Port Range | Source |
|---|---|---|---|
| ALL TCP | TCP (6) | ALL | sg-c815faac |
| ALL TCP | TCP (6) | 8888 | [Your own IP address] |
| SSH (22) | TCP (6) | 22 | 0.0.0.0/0 |
Also you need to create a key pair for ssh.
One final step is to create IAM policy and role.
A brief intro of IAM
IAM (identity and access management) is a role based access control (RBAC) system. The idea is an admin should create roles, assign access policies to them and specify who can assume the role (called “principle”). For example, a role can be “tester”, a policy can be “read S3” and a principal can be “EC2”.
Go to IAM console -> Policies, click “Create Policy”, and select “Create Your Own Policy”. Policy Name = “s3-readonly”, Policy Document =
{
    "Version": "2012-10-17",
    "Statement": [
        {
            "Action": [
                "s3:Get*",
                "s3:List*"
            ],
            "Effect": "Allow",
            "Resource": "*"
        }
    ]
}
Go to the IAM console -> roles, and click “Create New Role”. Give it a name “ec2-tester”, click “Next”. Select “Amazon EC2”, and from the list select “s3-readonly”, click “Next”, and “Create Role”.

Launch Cloudformation Stacks
Now you’ve got AWS ready to launch Cloudformation.
A brief intro of Cloudformation
Cloudformation is a service to group and launch AWS resources as a stack.
Resources include EC2 instances, load balancers, auto scaling groups, IAM roles and policies etc.
Cloudformation uses a JSON template to launch a stack, which defines all the resources needed. Cloudformation is able to figure out the resource dependencies and launch them in the right order.
The template can also include parameters and outputs.
First, let’s launch a OpsCenter stack.
Inspect cloudformation/opscenterd-cloudformation.json. You should see that the file contains those sections: “Parameters”, “Mapping”, “Resources” and “Outputs”. In “Resources”, you should see that it creates one EC2 instance with some user data (a bash script).
Go to the Cloudformation console and click “Create New Stack”. Give the stack a name like “OpscenterExample01”, and select “Upload a template to Amazon S3”. Upload opscenterd-cloudformation.json, click next. You should see this:

- CookbookS3: the “s3://[bucket_name]/[some]/[prefix]/[cookbook_name]” link to your cookbook tarball (Not the Link property you see in the console).
- Ec2InstanceRole: the name of the IAM role you created
- Ec2OpscenterdIp: an IP from the subnet you created.
- KeyName: the name of the key pair you created
- SecurityGroupId: the name of the security group you created
- SubnetId
- VpcId
Click “Next”, you don’t need any tags, so “Next” again, and tick the last box (Cloudformation needs confirmation that you want to create IAM resources) and click “Create”. You should see this:

Next, launch a Cassandra cluster. Follow the steps again, but this time upload “cassandra-cloudformation.json” and call the stack “CassandraExample01”. If you read the file, you should see it’ll create 3 seed nodes. Fill in the parameters, making sure you give the nodes different IP addresses. Click “Create”.
You should see both stacks are created, like this:

and all 4 instances are up:

Find the public DNS of your OpsCenter instance, and visit [You DNS:8888] in your browser, add the cluster IPs, and you should see:

Note:
Don’t forget to terminate the stacks, otherwise you could be billed.
Conclusion
Now you should have the basic idea of how those tools work and how they form a full DevOps development cycle. The most important thing is to note that infrastructure is now managed as code, with versioning and tests to allow an agile style of development.
This demo isn’t perfect, and as an exercise, you should find out how to:
- set up a CI server like Jenkins to automatically build and test cookbooks, and upload to S3/Chef server,
- use Chef server to host the cookbooks instead of S3,
- add an auto scaling group to the Cassandra stack so new nodes can be started when load goes up (but also consider the cool down policy),
- back up and upgrade the cluster (maybe using ELB and route53?),
- load test the cluster (see
load-tests/for an example)
Written with StackEdit.